Monday, June 30, 2008
So lately I've been noticing a distinct enlargement of my mid-section through over-indulging and lack of exercise. I've never been one for working out like a mad woman, but I do enjoy physical activity and to be honest the hardest part is getting motivated to begin. So I recently began reading a book I've had for about a year (yes, and I'm just now reading it): YOU On a Diet which outlines a whole plan for thinking about food differently and incorporating daily activity into your life. The best part? Exercise can be done easily in the comfort of your own home.

 Just like it sounds. In a standing position clap in front of you; then bring the arms behind you and clap behind you. Make sure to keep your chest lifted through the duration of the movement.
 Get into full push-up position with elbows and toes on the floor. Kepp your bum tight and your stomach pulled in toward your lower back. Hold position.
 9. (Stretch) Up, Dog, Up 10 seconds ea. position
 Reach your right hand forward and your left foot back and stretch them as far away from each other as possible, keeping your right hand higher than your head. The higher your arms goes up, the more work your back has to do and the more effective the exercise. Now, bring your right elbow to your left knee. Your stomach should be pulled in the entire time, supporting your lower back. Advanced Modification: move your arm and leg out at a right angle from body, keeping them above your spine.
  Lie flat on your stomach, reaching your arms out in front of you with palms down. Spread out your extremities straight out in all four directions and lift your arms and legs simultaneously for enough repetitions to cause some mild fatigue. Continue to look down during the movement, and don't over extend your neck up. Focus on how long you can make your body-not how high you can get it.
 12. (Stretch) The Seated Pretzel
 Sit down with legs stretched in front of you. Set your right foot down on the outside of your left knee. For back support, put your right hand behind your right butt cheek. Bring your left toe straight up. Reach your left hand up like a stop sign and then twist to right and bring your left tricep to outside of the right thigh. To go deeper, twist more to apply pressure against your right thigh. Act like a string is pulling the top of your head up to elongate the spine. Breathe by expanding your rib cage like you are blowing up a balloon.
  13. Leg Drop (like it's hot) exercise to failure
 behind your head, putting your opposite hand to opposite shoulder forming an X behind your head. Rest your head in this X and keep your neck loose (in the beginning, you can put a tennis ball under your chin as a reminder). Using your abdominal muscles, crunch up about 30 degrees from the floor. Without holding your breath, you need to suck in your belly button to the floor to tighten the natural girdle you have to keep the entire 6-pack tight (oh it's in there). Also pull up your pelvis muscles (like when you are holding in your pee) to strengthen the bottom of the natural girdle.
  the ceiling. To keep your back straight, interweave your hands around this knee. Act like there is a string pulling from the top of your head elongating your spine (and don't bob your head). Lift your left straight leg 6in of the ground, keep your left toe pointed towards the ceiling.
  with one hand (use one arm to hold something to keep balanced). Pull the foot toward your butt while lifting your chest forward and squeezing your shoulder blades together. Switch legs.
 Thursday, June 26, 2008

Wednesday, June 25, 2008
i was cruisin through cyberspace looking for innovative ways to add some decor flair when I came across this awesome how-to from iVillage. Cost and source of materials has been added by me! Your guide in a frugal-filled life.
Materials:
Artist wooden stretcher bars $14.82 Artistcraftsman.com
Fabric/paper I found a piece on sale at $4.99/yd Joann's Fabric and Craft
Cardboard
Cording $5.99 Joann's Fabric and Craft
Hot glue gun
Staple gun
To Make:
I’m a sucker for beauty products, and when I say sucker I mean I can not go within 10 feet of Sephora without being pulled to it like iron to magnets or a moth to the flame (or women to Robert Downy Jr, I mean for being a 10+ year drug addict the dude is smokin'... but I digress). The downside to this obsession of mine is the high price in which I pay to look (or maybe it's just appear) beyooooootiful (my grandma's words not mine....is anyone else noticing the obscene amount of parenthesis I seem to be using?). Anyway, there is nothing I love more than a cheap beauty find that happens to reside in the drugstore, because with me convenience is always worth it. So here's a list of my favorite cheapies that work.
 wrong. I love this tanner because, though it takes a few days to develop, it gives me all over color that appears natural and light. I usually use it after I've spent the day at the beach or by the pool since it seems to do much better as an enhancer rather than building a tan from scratch. Not to mention, the stuff smells good and pulls double duty as a lotion. Makes my skin soft and yummy? Check. Gives the appearance of a longer tan? Check. Gives me the brown skin I've alwasy longed for? Aaaannd Check.
 I read about this gem on 15 Minute Beauty Fanatic. You apply in the shower, leave on for a minute then scrub with the exfoliating beads. They aren't kidding when they say it leaves your skin smooth and soft. The results were incredible for a product that costs as much as an In-N-Out meal.
 e.l.f. Professional Complete Set of 12 Brushes $12

Managing Spend Lust Better Known As: I Gots the Urgin for Some Splurgin
0 comments Posted by Kari at 9:12 AMLately I've been coveting a high priced line of skincare known as the holy grail of facial products (well according to some of my favorite beauty blogs anyway). This product, Somme Institute, while effective and high quality, also comes at a hefty price. The following is a list of the products I want to purchase with their prices listed:
CLEANSER, 8 oz. $40
Total $250 (not including tax and shipping)
Now I deem this product worth it some several reasons:
- The serum and A-Bomb items are said to last around 4-6 months
- You can squeeze excess moisture off the Transport pads, using the liquid for an additional time after the pads are gone
- The high quality of the product ensures minimal amount used equals maximum results
- The proved benefit of these products along with my quest for perfect skin outweigh hefty costs incurred
The old me would simply run out, buy the product then feel the weight of the consequences later when I noticed a void in my bank statement (usually I hear crickets chirping too but I’m pretty sure that’s psychosomatic as opposed to reality). But the new me (the new me is defined as: frugal, cautious, patient and culinary-skilled…we’re workin’ on the last bit) has decided to wait to purchase these items. I recently set up 2 ING Direct accounts: one for my emergency fund and another for what I deem my “luxe” fund. This luxe fund will consist of dollars and cents I’ve saved when I was able to and when I’ve built a big enough chunk, I may use it for whatever I deem worthy with no guilt. I know this method may seem common sense to most, but would you believe it took me years to actually realize the benefit of such a system? Furthermore, in setting up an ING fund which is removed from my bank and thus, far more difficult to reach, has proved to be much more effective. So, my luxe-loving, frugal minded readers, I have listed other ways to cut impulse buying and save for what really matters: a Gucci bag, a BMW or just a really awesome massage.
Freeze Credit Cards
This is an idea that is as old as time (or as old as credit card debt maybe…). Stick your credit cards in some water and place in the freezer. Why does this method work? Because it forces you  to slow down and really think about your purchase before whipping out the plastic. You have to actually wait for the ice to thaw or make efforts to thaw the ice yourself before you can use the card. This allows time to be spent really thinking about the impending purchase and whether it’s worth it. Plus, in removing the credit card from you wallet, you are mitigating the risk of depending on credit as opposed to the cash you have on hand, which we all know can only benefit you in the long run.
Take Get Rich Slowly’s Advice: 30 Day Rule
I love J.D and his Get Rich Slowly philosophy. Not only is the man knowledgeable in the area of personal finance, he’s seen firsthand the havoc debt can create when you are simply irresponsible with your spending habits. His 30 Day Rule is unbelievably easy, yet you’ll surprise yourself with how such a simple concept is so novel to those impulse shoppers at heart. His steps are as follows:
1. Whenever you feel the urge to splurge — whether it’s for new shoes, a new
videogame, or a new car — force yourself to stop. If you’re already holding
the item, put it back. Leave the store.
2. When you get home, take a piece of paper and write down the name of the item, the store where you found it, and the price. Also write down the date.
3. Now post this note someplace obvious: a calendar, the fridge, a bulletin board. (I use a text file on my computer.)
4. For the next thirty days, think whether you really want the item, but do not buy it. 5. If, at the end of a month, the urge is still there, then consider purchasing it. (But do not use credit to do so.)
I like to equate this method with stop drop and roll. In the fired frenzy of desire, it takes a moment of clarity to stop, think about what you are about to do then calmly walk away (it’s ok to cry a little too).
Switch to Cash Only
I read a pretty interesting article in Money Magazine this month about eliminating credit and debit card purchases nearly entirely. The way this works is you set a budget for the month then withdrawal the amount of cash you are going to use. I suggest not keeping the entire amount in your wallet because, well, that would be beyond stupid. However, keep an envelope in your home with the monthly cash. Use debit cards for purchases that require Visa or Mastercard (online, travel plans and the like) but only use the debit card for absolutely necessary cases. Oh yeah, and cancel your credit cards…or employ tip one and put them on ice.
According to the article, the time period before interest in incurred on the balance of the card has dropped from 25 days to 20 days, and late payment amounts can add up over time. Additionally, studies have shown (and so has my pocketbook) that when plastic is involved, whether it be credit or debit, the spender is more likely to vary off course and spend more than when cash is in hand. The bank or credit card will often let you spend money you don’t have (albeit with some fees to pay later on), but the cash you carry, once depleted, is no longer there to spend.
Save the Money You Save
Hit a massive sale? Saved big with your coupons? Take the amount of money you saved in those transactions and apply them to your savings account. Often times, saving is all about mind games you play with yourself and this can be a small gesture that has big pay offs.
Out of Sight Out of Mind
Set up a savings account such as ING or eTrade and choose to direct deposit a portion of your  paycheck to these accounts each pay period. It follows the rule of paying yourself first and what you don’t see in your checking account, you don’t miss. It’s the most pain-free way of saving I’ve come across thus far and has yielded significant results. Sure, less money goes into my checking account but I find that I still have money to pay all my bills. What I don’t necessarily have money for are all the small inconsequential purchases I used to make (4 bucks for a coffe? Sure! Another 20 for a meal out? Alrighty! OOOh I really like those shoes….) but I know that in saving my money I will be rewarding myself soon.
I think the primary principle in saving money is similar to following a diet. It isn’t a temporary lifestyle, but rather a lifestyle change. Furthermore, it isnt’ about depriving yourself entirely of enjoyment, but rather finding enjoyment in simpler things for the time being until you can afford to splurge. It’s hard to stick with a plan that never rewards you, but when you can indulge yourself guilt-free life is that much sweeter.
Thursday, June 19, 2008
I want to introduce a new segment I'll be doing every Thursday: Thrifty Find Thursday. Each Thursday I will compile an outfit made up of garments that cost under $25 each. So enjoy all you frugal fashionistas out there!
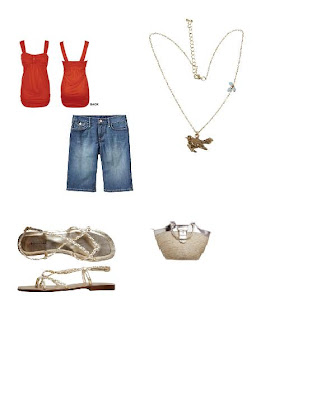
Denim Bermuda Shorts Old Navy On Sale for $11.99
Gold Sandals Payless Shoes $15.99
Necklace Forever 21 $5.80
Straw Bag with Gold Detailing Payless Shoes On Sale for $12.99

Take Your Gas Mileage
This can be done by setting your trip odometer to 0 the next time you fill up at the gas station. On your next stop at the gas station make sure to note how many gallons it took to fill your car up. Record this number along with the reading on your trip odometer; divide the number of miles driven for that period by the number of gallons it took to fill the tank. This is your gas mileage.
Lighten the Load
Simple people: the heavier the car, the more energy it uses in hauling it’s fanny down the street.
Avoid Hard Acceleration
The harder you press down on the gas pedal, the more gas you’re gonna use. If you have an automatic transmission, let momentum carry you forward a bit before pressing the gas pedal. It takes a lot more energy to start a stopped object than it does to increase the speed of an already moving object. Capiche?
Car Maintenance
Tires that are low on air make your car work that much hard to reach and maintain speed. Also, changing your oil every 3,000-5,000 miles will ensure that your car runs easily and thus, uses less fuel.
Park Forward
Park in a spot facing out, since it uses 25% less gas to pull forward than it does to back out.
The 3 Second Rule
Do you believe that cars actually apply their brakes 10%-25% more than necessary? Actually, after driving with my mother….I believe it. In creating a three second cushion between yourself and another car, you are allowing yourself more space to adjust to the other drivers around you without constantly applying the brakes (sidebar: if you can’t remember how to do the three second rule choose a landmark as you’re driving and time the number of seconds that pass from the time the car ahead of you passes it to the time you pass it). Through creating a buffer between yourself and other cars, you are more likely to rely upon your car’s momentum rather than the brake to slow down; doing so takes less energy (read: gas).
Remember, even when employing some of these tips; be courteous and aware of other people on the road. Sure, going exactly the speed limit is going to save you some money but is it worth causing an accident?
Tuesday, June 17, 2008
Lately I've been debating about whether to cancel my cable. I know this will save me loads of money per month, but it will also induce massive amounts of boredom since TV is one of my main sources of entertainment (oh I know, I'm a total potato ok?).
Now before you wax on about how I’m killing brain cells and I’m nothing but a droid obsessed with obtaining “stuff” fueled by the havoc commercials wreak; allow me to defend myself. 1) I have Tivo so those commercials hold little power over me and, more importantly, 2) I’m also a huge reader. Books, however, are something I can dramatically reduce the cost of.
There are the obvious choices such as the library and used book stores. However, I managed to come across another (easier) source for my thirst of knowledge. What is this titillating tidbit you ask? Why it’s Paperback Swap! An online medium for folks to get rid of the books they don’t want and find books they do. How it works is you register and list the books you have and want to get rid of; which is done by ISBN number (the barcode numbers on the back of your book). Each book is worth a credit, so you send a book off and you receive one credit which can then be used to select a book from another user. Granted, the likelihood of finding new releases is rare, however, I’m willing to wait a few months to save 15 bucks. Shipping typically costs around $2.50 and while you pay to ship the book to the requester, when you request a book the shipping is paid for.
I love this site because, though I enjoy knowledge packed non-fiction, I've also been known to devour a little genre called Chick-Lit. Chick-Lit books make awesome beach reads, but are a little hard to justify purchasing since I tend to read them once and be done with them (unlike books similar to Freakonomics and The Encyclopedia of Theories books I read over again). It's a perfect way to indulge guilt-free and still stay busy during the idle summer months.
When I was younger my mother used to make an excellent (and cheap!) meal: Cabbage and Noodles. That’s it. It was an easy meal that featured simple ingredients and looking back I now know she made it, not for it’s inexpensive attributes, but rather because she has always hated cooking and this recipe is super easy. Sauté onion in a pan of butter, add cabbage. Boil egg noodles al dente, add to mixture, salt and pepper to taste. Add boiled kielbasa sausage and in 15 minutes you have a meal that kids love (me and my sister did). My father hated this meal, however, because he said it reminded him of the Depression and it’s simplicity left much to be desired (can you tell, he’s the cook in the family). Though the economic outlook was much more optimistic during this time (it was the early 90s, after all), I feel that cheap eats is more a priority now than ever before. Not only has gas reached record proportions but food has as well. According to MSNBC According to MSNBC, food inflation is the highest it’s been in 17 years and
“Eggs cost 25% more in February than they did a year ago, according to the
USDA. Milk and other dairy products jumped 13%, chicken and other poultry nearly
7%.”
The cost of wheat has particularly caught my eye, because this effects everything from ceral to bread to crackers. According to ABC correspondent, Sharon Alfonsi on World News with Charles Gibson:
“U.S. wheat stock piles have hit a 60-year low and wheat prices have never been
higher. That means the cost of pasta has doubled and that loaf of bread – it’ll
cost you an extra 20 cents. Economists say it is the fastest-rising rate of food
inflation in nearly 15 years.”
So it all got me thinking….I have recently realized that food is an easy way for me to save money. I refuse to sacrifice quality of cosmetics, hair product and skin care, however, food is something I can easily scrimp on. Not only can I save by employing my shopping savvy skills (coupons, lists etc), I can also choose recipes that feature inexpensive ingredient. Genius! (….or common sense for the innately frugal folks). Though something like rice and beans is an easy and cheap recipe, I wanted to feature some recipes that didn’t scream “RECESSION!” So for your palate pleasure here are my choices of cheap recipes.
I came across a blog called Cheap Eats where $3 recipes are featured. The following is his recipe for Penne Pasta Casserole (I eliminate the meat since I’m a vegetarian which further lowers the cost). Another tweak I would do is substitute mozzarella cheese for cheddar, I don’t believe it would raise the cost of the recipe too dramatically. Besides, I’m far too Italian to make this dish without a proper nod to my people.
Penne Pasta Casserole
1 26oz can spaghetti sauce (Hunt’s, etc.)
1/2 med. yellow onion
1 tbsp e.v. olive oil 2-3 cloves minced garlic
1/2 box dry penne or other pasta
1/2 cup basil leaves, chopped
1 cup grated cheddar
1/3 lb ground beef or italian sausage
salt, pepper, sugar to taste
Brint a pot of water to a boil, preseason with salt and olive oil. Over low heat in a large skillet, add some olive oil, onion, garlic and a pinch of salt; sauté until translucent (you can keep adding some water to prevent it from drying out). Remove to a plate. Add the ground beef and/or italian sausage (casing removed) and brown that. Drain it, return to pan with onion mixture. Add spaghetti sauce, and cook on low stirring occasionally for about 10-15 min. Add chopped basil (and any other herbs or veggies at this point). You may want to alter the flavor with salt, pepper and sugar depending on your spaghetti sauce.
When water boils, add the penne and UNDERCOOK it. How much depends on you and your oven. I just know you don’t need to cook it all the way because it’s going in the oven. When done to your liking, drain pasta and rinse it in cold water, if you like. I know they say not to rinse it, but because it’s a casserole I feel the noodles benefit a bit from a dunk.
Combine spaghetti sauce mixture and noodles together in the pot. In a shallow baking dish (flatter, shallower allows for more cheese browning area - if you like that.) Top with cheese, bake at 350F for about 30-45 minutes. You might want to cover lightly with aluminum foil until the last 10 minutes. You can also blast it in the broiler if you like the top extra crunchy.
Before I went veg I loved the combination of Turkey and Cranberry. Here is an easy recipe for those of you who share my sentiment. Additionally, if fresh cranberries can not be found, I’d substitute dried ones.
Cran-Apple Turkey Medallions
2 pounds turkey tenderloin, cut into 3/4 inch medallions
salt and pepper
1 tablespoon butter
1 tablespoon oil
2 minced garlic cloves
4 diced shallots
1 cup peeled and diced cooking apples
1/2 cup coarsely chopped cranberries
1/2 cup orange juice
Salt and pepper the turkey medallions. Melt the butter and oil in a large skillet. Brown the turkey medallions quickly on each side. Reduce the heat and add the garlic and shallots. Cook until the turkey is thoroughly cooked and no longer pink in the center. Place the medallions on a warm serving plate. Add the rest of the ingredients to the skillet and bring to a boil. Reduce the heat and simmer until the apples are soft. Pour the sauce over the medallions and serve.
I found this recipe on Frugal Cooking and though not fast, makes a great snack. Perfect for freezing and having anytime, it take’s a little elbow grease, but once made would be a great convenience.
Soft Pretzels
*If you plan to freeze these do not put salt on them until after you pull them from the freezer
4 to 4 ½ cups flour
2 ¼ teaspoons yeast
1 ½ cups milk
¼ cups sugar
2 tablespoons cooking oil
1 ½ teaspoons salt
3 tablespoons salt
2 quarts boiling water
1 slightly beaten egg white
Sesame seed or coarse salt
In mixer bowl combine 2 cups of the flour and the yeast in saucepan heat milk, sugar, oil and 1 ½ teaspoons salt just till warm (115 –120) stir constantly.
Add to flour mixture. Beat at low speed of electric mixer for ½ minute,scraping bowl. Beat 3 minutes at high speed.
Stir in as much of the remaining flour as you can mix in with a spoon.
Turn out onto lightly floured surface. Knead in enough of the remaining flour to make a moderately stiff dough that is smooth and elastic(6-8 minutes) Shape into a ball.Place in lightly greased bowl; turn once to grease surface.
Cover; let rise in warm place till double( about 1 1/2 hours)Punch down; turn out onto lightly floured surface,cover let rest 10 minutes. Roll into a 12x8 inch retangle. Cut into 16 strips, each 12 inches long and ½ inch wide. Roll each into a rope 16 inches long.Shape into pretzels.
Let rise, uncovered, 20 minutes.
Dissolve 3 tablespoons salt in the boiling water. Lower 3 or 4 pretzels at a time into boiling water; boil for 2 minutes, turning once. Remove with slotted spoon to paper toweling; let stand a few seconds then place ½ inch apart on well greased baking sheet.
Brush with mixture of egg white and 2 tablespoons water. Sprinkle lightly with sesame seed or coarse salt. Bake in 350 oven 25 to 30 minutes or till golden brown.
Wanna figure out the cost per serving of some of your favorite recipes? Check out this awesome Cost Per Serving calculator
Friday, June 13, 2008

Body Aches and Pains: It has been said that olive oil can relieve pain caused by arthritis, and the results last for a substantial amount of time. You can also ease muscular tensions my massaging the oil into sore spots. You will feel the effects immediately.
Earache relief: According to Rachel Lewis, MD, a pediatrician at Columbia University Medical Center. Warm olive oil can be used to soothe the symptoms of an achy ear. (Note: Only for kids 2 and up). Use a syringe to place 2 to 4 drops of warm oil in the ear of child, 5 to 10 in ear of adult. Make sure to follow up with doctor as this is not a cure.
Dry-hair conditioner: Healthy Living found this use for olive oil: Revive damaged hair with this treatment from John Masters of John Masters Organics hair- and skin-care lines: Saturate hair with extra-virgin olive oil, then wrap with a warm towel for 20 minutes. Shampoo, rinse, and condition if needed.
Lip Balm: Mix olive oil and bee’s wax in a 1 to 1 ratio.
Bath Oil: Pour 1-2 ounces of olive oil into the bath (mix with essential oils for a soothing aromatherapy affect)
Body Scrub: Mix oil with sea salts or sugar for an invigorating and hydrating scrub. You can also use coffee grinds, which will minimize the looks of cellulite.
Sleep Better: By having a sip of olive oil before bed, you may hydrate a dry throat and lubricate throat muscles. …this is one I’m going to have to pass along to my parents.
Treat Lice: Apply olive oil to your youngster’s hair, and leave on for at least 40 minutes. Shampoo twice, then apply a preventative.
Remove paint from your skin: Rub on olive oil onto messy hand and arms (or faces) and allow the oil to soak into the skin for five minutes, and then rinse with soap and water.

This can be relatively cheap and easy to do. Check out JoAnn’s or Beverley’s for clearance fabric;
 usually there are some really great patterns out there that would make a god-awful Mumu but an excellent piece of work. You can typically pick up fabric for as low as $3.99 a yard. Cut the fabric and staple to a piece of cardboard for a tight appearance (don’t glue it or it may bubble) and frame. Voila! A fine piece of art for under $10.
I wouldn’t recommend an entire wall dedicated to this particular element, but hanging a few empty frames among a cluster can help simplify a design technique that can be overwhelming
to the eye. An ornate frame works best for this since it is, in and of itself, aesthetically pleasing to look at.
I don’t think I need to tell you that for the generations that will follow the Baby Boomers into retirement, Social Security will be a distant, quaint memory. The truth is, I believe young people recognize how important it is to invest in a 401(k), however, how many of these younglings recognize the value in saving now rather than later? According to a new report, "401(k) Plans Are Still Coming Up Short," from the Center For Retirement Research at Boston College, only 62% of people ages 20-29 participate in employee 401(k) plans.
Now I know what you’re thinking, “But I don’t make enough to contribute to my company’s 401(k)!” and my answer to you is this: you can’t afford not to. Most companies match fifty cents to your dollar for up to 6% of your contributions and that, dear friend, is what we call free money. When these contributions are deducted from your paycheck pre-tax, it’s hard to even miss what wasn’t there to begin with. Ya dig?
Money Crashes puts it in this respect:
if you started contributing to $100 a month to your retirement account at the
age of 25, and you were going to retire at the age of 60, then your account
would reach $379,000. If you started saving for retirement at the age of
35 with the same contribution, then you would have just $132,000.
And that scenario doesn’t even account for company contributions! Bottom line and common sense dictate: the sooner you begin to invest, the longer amount of time your money has to grow based upon your employer’s (or your own homegrown) portfolio mix. This has an impact on your bottom line when the gains from each year build upon the previous year’s balance (compounding interest at work).
Diversify
When you begin to invest at an earlier age, it also enables you to take more risk. The volatility of the market will have less negative impact on your balance, in the long run, and can actually work in your favor. In order to save enough money to live work-free, you will need the monetary growth that stocks are capable of providing. According to CNN:
From 1926 through 2006, stocks - broadly speaking, using the S&P 500 index
as a measure - have posted an average annual return of 10.4 percent versus just
5.9 percent for bonds, according to Ibbotson Associates.
 However, before you rush out and put all your money on the company is providing timeshares for your dog (the next big thing, I swear). You should consider stock funds as opposed to individual allocation. Money Magazine provides an excellent allocation plan that diversifies and ensures stability (see left). Additionally, I recommend checking out this helpful tool Retirement Calculator, which can be incredibly eye-opening...and a little stress-inducing.
Different types of accounts:
Now that we’ve gone over the basics here are a few different accounts broken down to a very, very basic level.
401(k)- this is the plan offered to you through an employer
Traditional IRA- provides tax-deferred growth, which means you pay your taxes on the investment gains only when you make withdrawals. Furthermore, based upon your qualifications, your contributions may even be deductible.
Roth IRA- contributions are not tax-deductible but when you withdraw your gains, you don’t owe Uncle Sam any tax.
Roth 401(k)- provides no up-front tax deduction, so your contributions won't reduce your current taxable income. But all the money you withdraw is tax-free as long as the funds have been in the account for at least five years and you are at least 59½ years old.
No matter what you decide to do, all I can reccommend is extensive research and utilizing the tools that are offered to you. Best of luck dear friends and let me know if you ever buy that shiny black Aston Martin!
Thursday, June 12, 2008
I'm not going to delude you into thinking that I am one of those coupon ninjas, swooping into the grocery store matching coupons with sale items with thrift-like precision and buying $200 for $3.39. But I will tell you that there are a few things out there I picked up on that do save me money. Let's face it: five dollars saved? Well then that's five more dollars I get to keep.
Keeping a Price Book
This is a strategy I picked up from Amy Dacyczyn's The Complete Tightwad Gazette, and it's a relatively cheap and easy thing to do. All you need is a spiral  notebook (or binder) and the weekly ads from your local grocers....oh yeah and maybe an hour or so of time. Each page in my notebook is labeled by item and then alphabetized (this is where a loose leaf binder may be more user-friendly). It is on these pages that i keep track of individual grocery stores sales. If you often shop at more than one store you can also record everyday prices here too which will track pricing trends (and inevitably save you more). Since I am all about convenience (along with frugal methods) I tend to only focus on sale items, keeping track of the normal prices at the one grocery store I frequent and comparing the sale items to other stores. I've found that for the most part, my grocery store tends to be cheaper with better sales with the odd exceptions here and there. You can print a free price log here: Grocery Price Log
Coupon Clipping
Let me tell you, this is probably the most fun but for me. I only clip the coupons for items that I actually buy. I use the following sites in addition to the weekly inserts in my Sunday paper:
Why does this work?
Coupons in the newspaper are usually the first wave of a product push from large companies. They’ll put out coupons to start bumping up the sales, then they’ll move onto sale prices later on in the promotion. The reason for doing these in waves is so that the overall product sales trend looks solidly positive and not just a big spike with a fall-off. Plus, coupon users who use the product, like it, return to the store, and notice the item on sale are often willing to buy the item again. I’ll admit to noticing this working for me in the past with products like V-8 Fusion.
List, List, List
OK, look I know this one is pretty basic but hear me out. Have you ever stopped by the grocery store when you were hungry for just a few quick items? Next thing you know you're walking out with 4 boxes of Eggo Waffles, frozen pizzas and those really delightful fruit snacks with juice
 in the middle. Believe me, I've done this so many times that now I ensure I am satisfied before shopping, even if it mean having to go home from work to eat before setting out on my journey.
Well keeping a list is a lot like that. Sit down and make of list of the items you need or will need and have coupons for. It's easy to sit down after clipping your coupons and compiling a list of items you need based upon weekly sales, coupons and legitimate needs (if you're low on toilet paper, chances are you aren't going to be waiting around for a sale or a coupon to save that extra $.55). When you go to the store, stick with this list! I don't care if kumquats are on special $2 for 10lbs. If it isn't on your list, don't get it. This minimizes the affects of GADD (Grocery Attention Deficit Disorder) and your chances of walking out with unnecessary items that cost you money.
I know my tips hear aren't Earth shattering, nor will they probably save you thousands of dollars (if they do, by all means you can send some my way), however, hopefully you've picked up some interesting strategies to try out. Make sure to keep me posted on your savings!

So for all you fellow self-indulgers out there, here are some at-home recipes you can try that won't hurt the pocket books and will still give you that same spa feeling (ok, ok maybe not the exact same but we're on a budget people!) Recipes courtesy of Spa Index
p.s these work wonders with a nice glass of red wine and your closest girlfriends handy.
Apple Cucumber Facial Mask
1/2 cucumber, peeled
1 egg white
1/2 teaspoon lemon juice
1/2 teaspoon lime juice
1/2 teaspoon apple mint leaves
1 drop lime essential oil
Combine all 5 ingredients in a food processor and process until smooth. Add the essential oil last and mix well. Refrigerate the mixture for 10 minutes.
Apply a layer to your clean face and neck area and leave it on for 20 minutes. Rinse well with warm water. Apple Cucumber Facial Mask is best when used immediately as the ingredients are perishable. The leftovers can be refrigerated in the coldest section of the refrigerator for up to 1-2 days but should be discarded after that
AVOCADO CARROT CREAM MASK
This mask combines avocados, which are rich in Vitamin E, with carrots, which are high in beta-carotene and antioxidants, and cream, which is high in calcium and protein. These ingredients will rebuild skin collagen, improve tone and texture, and fade age spots.
1 avocado, mashed
1 carrot, cooked and mashed
1/2 cup heavy cream
1 egg, beaten
3 tablespoons honey
Combine all ingredients in a bowl until smooth. Spread gently over your face and neck, and leave in place 10-15 minutes. Rinse with cool water and follow with your favorite toner.
Frozen Egg & Honey Facial Mask
Recommended for dry skin
1 egg
1/2 cup coconut oil, melted (but not hot)
1 tbs. honey
Step 1: Beat the egg in a small bowl until frothy and well-mixed. Slowly add the liquid coconut oil and honey, beating until your mask is the consistency of mayonnaise.
Step 2: Take an empty toilet tissue roll and set it on end in a clean bowl. Spoon mixture into the cardboard toilet paper roll (or consider using an empty deodorant container). Place tube, in the bowl, in the freezer overnight.
Step 3: To use, peel away just the top 1/4 inch of the cardboard roll and smooth the frozen stick over your face (think of it as a push up pop). Leave your mask on for 5 to 10 minutes, then rinse off with warm water.
Return the cream stick covered with plastic wrap and frozen between uses.
Particularly soothing on a sunburn. Keeps indefinitely.
OATMEAL BLUEBERRY MASK
This easy mask, used once or twice monthly, will both deep clean and exfoliate your face. It's particularly beneficial for oily skin, as it drying and pulling effect.
1 cup oatmeal
1 cup blueberries
1 tablespoon honey
5-6 almonds, whole
Puree all ingredients in a blender until finely blended. Spread mixture over your face, and allow to set and dry (10-15 minutes). Rinse with warm water, and splash your skin with cool water or toner. This mask be may stored in your refrigerator for up to one week, covered tightly.
SPA INDEX HONEY OATMEAL FACIAL
1/4 cup plain yogurt or buttermilk
1/2 cup oatmeal
2 tablespoons of honey
Finely grind or process the oatmeal in a blender or food processor. Set aside. In a small bowl, stir together honey and yogurt, and then add ground oatmeal. Mix thoroughly until a smooth paste consistency has been reached. Smooth over your face and neck, leave on for fifteen minutes, and rinse off with warm water. Can be used daily.
ALMOND-MAYONNAISE SCRUB
Recommended for Dry Skin; Exfoliation
1/4 C. almonds
1/8 tsp. mayonnaise
Grind almonds in blender until they form fine almond meal. Whirl in mayonnaise. Gentle rub scrub onto your face, and leave in place 10 minutes. Rinse. Use a toner thereafter. Shelf Life: Refrigerate for 2-3 weeks.
so....is anyone else kind of hungry?
Wednesday, June 11, 2008
Remember when you'd be standing in line at Disneyland and the ride escorts (what is the formal name for those guys?) would shout that phrase for all the park to hear about the single spot they had open next to a kid? And that kid, oh that poor, poor kid would be trying his hardest to shrink in his seat so as to appear as innocuous as possible. Cooking for one can often be like that.
Sure making your money stretch when feeding a family of four can be daunting, but you’re also wasting little in ways of food. Cooking for one? Well I did manage to make a box of Macaroni and Cheese last for approximately 5 days but it is now a very rare occasion where you will find me eating it at all. So it begs the question: how does one save money on cooking (while keeping a healthy amount of variety in the meals) when the amount of cooking they need to do is for 1-2 people?
Prepare Meals a Week Out
Sounds easy enough right? Compile a select few recipes and build your week's meal around these (Bonus Point: Choose recipes that feature ingredients coinciding with that week’s grocery sales). This ensures that you will only be making one shopping trip (possibly two to capitalize on any deals your local grocers have going) which saves on gas and time.
Cook Once, Eat Twice
I hate leftovers, no wait I despise them. However, if I make something one night, and realize it can be turned around for a whole new meal the next, well then you’ve got yourself a deal. The most versatile ingredient to do this with is chicken. Now although I, myself, am a vegetarian I’m sure many of you out there are not. So here is an example of two recipes using the same ingredient.
Chicken Risotto
INGREDIENTS:
4 boneless, chicken breasts
3 Tbsp. olive oil
1/2 tsp. salt
1/8 tsp. pepper
1 onion, finely chopped
3 cloves garlic, minced
2 cups uncooked regular long grain rice
4 cups chicken broth
1 cup grated Parmesan cheese
2 Tbsp. butter
PREPARATION:
Cut chicken breasts into 1-1/2" pieces and sprinkle with salt and pepper. In heavy saucepan, heat olive oil over medium heat. Add onion and garlic, and cook for 5 minutes until tender. Add chicken pieces, and cook and stir until chicken begins to brown, about 3 minutes.
Cook until liquid is reduced, stirring frequently. Continue to add chicken broth to keep rice covered, stirring frequently. Cook about 25 minutes until rice is tender. Add cheese and butter just before serving and stir to melt. 6-8 servings
Risotto Cakes with Tomato Sauce
INGREDIENTS:
1 Tbsp. olive oil
1 onion, finely chopped
14 oz. can diced tomatoes, undrained
1/2 tsp. dried thyme leaves
1 Tbsp. fresh chopped parsley
1 tsp. sugar
salt and pepper to taste
1 egg white
2 cups leftover Risotto
3/4 cup dry purchased bread crumbs
1/4 tsp. dried thyme leaves
2 Tbsp. butter
2 Tbsp. olive oil
PREPARATION:
In large saucepan, saute onion in 1 Tbsp. olive oil until tender. Add tomatoes with their liquid, 1/2 tsp. thyme, parsley, and salt and pepper to taste. Bring to boil, then reduce heat and simmer over low heat while preparing risotto cakes. (You could also just warm up 2 cups of your favorite pasta sauce.)
Preheat oven to 400 degrees. In large bowl, combine egg white and leftover risotto and blend until combined. In shallow pan, combine bread crumbs and 1/4 tsp. thyme leaves. Form 1/4 cup portions of the risotto mixture into 8 cakes and roll in bread crumb mixture to coat.
Heat butter and 2 Tbsp. olive oil in nonstick skillet. Fry risotto patties 2-3 minutes on each side, turning once, until golden brown. Place on cookie sheet and bake at 400 degrees 5-10 minutes until heated through. Serve with tomato sauce. 4 servings
Easy Freeze
Incorporate meals that are easy to make, portion out and then freeze. One of my favorites?
Vegetarian Chili
INGREDIENTS
1 tablespoon olive oil
1/2 medium onion, chopped
2 bay leaves
1 teaspoon ground cumin
2 tablespoons dried oregano
1 tablespoon salt
2 stalks celery, chopped
2 green bell peppers, chopped
2 jalapeno peppers, chopped
3 cloves garlic, chopped
2 (4 ounce) cans chopped green chile peppers, drained
2 (12 ounce) packages vegetarian burger crumbles
3 (28 ounce) cans whole peeled tomatoes, crushed
1/4 cup chili powder
1 tablespoon ground black pepper
1 (15 ounce) can kidney beans, drained
1 (15 ounce) can garbanzo beans, drained
1 (15 ounce) can black beans
1 (15 ounce) can whole kernel corn
DIRECTIONS
Heat the olive oil in a large pot over medium heat. Stir in the onion, and season with bay leaves, cumin, oregano, and salt. Cook and stir until onion is tender, then mix in the celery, green bell peppers, jalapeno peppers, garlic, and green chile peppers. When vegetables are heated through, mix in the vegetarian burger crumbles. Reduce heat to low, cover pot, and simmer 5 minutes.
Mix the tomatoes into the pot. Season chili with chili powder and pepper. Stir in the kidney beans, garbanzo beans, and black beans. Bring to a boil, reduce heat to low, and simmer 45 minutes. Stir in the corn, and continue cooking 5 minutes before serving.
One of the best websites I came across is All Recipes since it allows you to adjust your serving size, which in turn automatically adjusts the ingredients (goodbye dividing fractions, I never did like you much). Additionally, you can select recipes that catch your fancy and add them to a shopping list function thus make shopping even more convenient!
Have any yummy, frugal recipes? Do share.
Wow, that phrase is a blast from my college business course past. With the housing market taking a turn for the worse I had an epiphany that perhaps, now would be an ideal time to buy. Especially since I am a young professional with nary a black spec on my credit report (well 0k there is the Cox Bill debacle of ’07 I still need to straighten out) nonetheless, I begin to ponder whether a mortgage of a slightly higher price is better than rent. After all, this money is going towards an investment, something that will only benefit me in the long run right? Wrong. Turns out, counterintuitive as it may be, that buying isn’t always the best option. First clue to this conclusion (excluding the lecture I received from my mother along the same lines) was a website I stumbled upon called TCalc a web based financial calculator that, among numerous other scenarios, can calculate how much money you save by renting or buying. You can see my results below:
According to the site I would save $11,360.31 over the next 5 years by renting.
So if you realize renting is your best option for the time being, how do you ensure you are paying a fair price for your area? Rest assured, my friends, I've got this one covered as well: check out RentoMeter. It'll give you the surrounding rents for your area and provide your rent on a Barometer scale. Mine ended up falling right in the middle. Share your thoughts on renting vs buying. I'd love to hear.

I recently downgraded from a one-bedroom apartment to a studio. Living in San Diego as a young, single female, this decision was the most logical in saving money, simplifying my life and also seeing if maybe Carrie Bradshaw was onto something. While the extra money I save in living in a smaller space will not go to expand my non-existent collection of Christian Louboutins (oh the humanity), it will go into an ING Direct savings account I opened that is currently earning 3.00% APY which is far more than my credit union. Thus, building that famous “emergency fund” we are always reading about from personal finance blogs (see, The Simple Dollar’s Emergency Funds: How and Why You Should Get Started Right Now)
Anyway, for your reading enjoyment a brief list, according to Suite101 on the sweeter side of studio living:
Keeping Studios Clean
Most studios don't have room for dust-collectors like coffee tables, china cabinets, and entertainment centers. Instead, buy double-duty furniture (day beds and decorative chests), some functional items (computer desk, small dining table, television stand), and if space allows, a sofa or bookshelf. The flip side is that small spaces magnify anything that is less than white-glove clean. If you forget to make your bed or mop the floor when a visitor stops by, you can't close the bedroom door or shoo guests out of the kitchen.
Decorating A Small Space
Keeping clutter to a minimum goes a long way. Keep the kitchen area neat and free of dirty dishes, and vacuum and dust frequently. A studio is not the place for knickknacks any more than it is for large furniture. These things take up valuable space. Make sure that furniture and decorations don’t impede movement around the space. It pays to measure the furniture and make a floor plan before moving in. Don’t rent sight unseen and plan to just fit everything in once you get there.
Organizing Small Apartments
Plan before going grocery shopping. Small spaces have limited storage room. Bargain shoppers beware - there may not be room for jumbo packs of paper towels. Clutter makes a small space seem even smaller. To achieve a cozy but airy atmosphere, store things in sneaky spaces – under the bed or sofa, in the cabinet over the fridge (just not in the stove – it’s dangerous). Try dividing the space into mini-rooms. Place a small telephone stand in one corner. Create an entertainment space: buy a shelf that attaches to the top of the television to hold a stereo.
Add Simple, Personal Touches
Life in a studio is simple living at its finest. Everything you need is there - a roof over your head, a place to sleep, a place to cook and eat. You also have room for those touches that make a space home. Walls to hang pictures, a window ledge to place a vase of flowers, a closet or corner for mementos and books. What you do not have room for, you truly don’t need right now.
Tuesday, June 10, 2008
So I recently discovered e.l.f cosmetics, and though the path that led me to this discovery was paved in gossip and ruminations, I certainly don't regret the destination. Some of you may have heard the rumblings of Bloomingdale's purchase of a small internet-based cosmetics company. Well these rumors are untrue, however the price of the product is very, very real. Most items on the site can be purchased for $1; that's right my fair, frugal friends, you can stock up on make-up brushes, and all your cosmetic needs for a buck each.
I received my package about a month after my order was placed (due to high volume of orders, shipping takes an obscene amount of time). While I wouldn't necessarily choose their eye shadow as my first pick in a line up, I found their lip balm, make-up brushes and eye liner to all be suitable. C'mon folks, for a dollar it's at least worth a lookie loo. Check them out at: http://www.eyeslipsface.com/shop.asp
